In this series of posts:
Oracle's Backup Cloud Service (OCI)-1 - The Oracle OCI Backup Cloud
Oracle's Backup Cloud Service (OCI) - 2 - You are here
Oracle's Backup Cloud Service (OCI) - 3 setup your backup
In my previous post, I talked about OCI Backups and their advantages. Here's how you do it:
Before you start, verify you have Java 1.7+ installed on your server (java -version) and download the MML software:
In a browser, go to:
https://console.us-ashburn-1.oraclecloud.com/
1. Setup your tenant
2. Create your user
...those steps keep changing, so I'm not going to tell you how to do them...but if you go to that page, it should be pretty self-explanatory. Ok, so at this point you're in.
3. On the top right, select the region that's geo-located closest to you. Be aware of any in-country requirements for your database backups.

5. To make management easier, put each database’s backups into its
own bucket. If you don’t see the bucket
for the database you’re working on, create one by clicking on the “Create
Bucket” button.
6. Fill in the “Bucket Name” text box with the database you want to add and select “standard tier”, then click the “Create Bucket” button. The list price of standard tier is $0.025 cents/GB, and archive price is $0.0025 cents, but you’re required to keep archive for 90 days and there’s up to a 4 hour lag if you need to pull back archived files...so unless its a rare backup you're going to keep for an extended time, you want standard.

7. For the install to work, we first need to get:
Oracle's Backup Cloud Service (OCI)-1 - The Oracle OCI Backup Cloud
Oracle's Backup Cloud Service (OCI) - 2 - You are here
Oracle's Backup Cloud Service (OCI) - 3 setup your backup
In my previous post, I talked about OCI Backups and their advantages. Here's how you do it:
Before you start, verify you have Java 1.7+ installed on your server (java -version) and download the MML software:
http://www.oracle.com/technetwork/database/availability/oracle-cloud-backup-2162729.htmlIn a browser, go to:
https://console.us-ashburn-1.oraclecloud.com/
1. Setup your tenant
2. Create your user
...those steps keep changing, so I'm not going to tell you how to do them...but if you go to that page, it should be pretty self-explanatory. Ok, so at this point you're in.
3. On the top right, select the region that's geo-located closest to you. Be aware of any in-country requirements for your database backups.

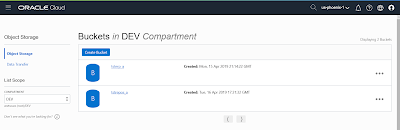
4. On the top left, click on the hamburger (the button with 3
lines), and then click “Object Storage”.
The Object Storage page will appear:

6. Fill in the “Bucket Name” text box with the database you want to add and select “standard tier”, then click the “Create Bucket” button. The list price of standard tier is $0.025 cents/GB, and archive price is $0.0025 cents, but you’re required to keep archive for 90 days and there’s up to a 4 hour lag if you need to pull back archived files...so unless its a rare backup you're going to keep for an extended time, you want standard.

7. For the install to work, we first need to get:
a.Cloud Infrastructure API signing keys
b.tenant OCID
c.user OCID
d.fingerprint of our RSI key.
8. Click the profile button in the top right corner (it looks like a head in a circle) and select user details. Click "copy" and paste the USER OCID to the editor of your choice. It should start out with: "ocid1.user.oc1.."
9. Click again on the profile button in the top right corner (that looks like a head in a circle) and this time select "Tenancy: [whatever your tenancy is called]"
10. Under the Tenancy information, click on "Copy" and copy the tenant OCID and paste it into the editor of your choice.
11. Assuming you have an nfs mount that's shared on all your database servers, make a directory on that mount... ie: mkdir /nas/dba/backups/cfg/opc_wallet
12. In your database server, go to the directory you unzipped the software into and get a new RSA key pair:
12. In your database server, go to the directory you unzipped the software into and get a new RSA key pair:
java -jar oci_install.jar -newRSAKeyPair -walletDir /nas/dba/backups/cfg/opc_wallet
13. View the oci_pub file and select it so it loads into your laptop's clipboard (starting at the first dash, stopping after the last dash)
14. Once again back to the Profile button in the top right corner, click on your user and scroll down to the bottom of the page where it says, "API Keys" and click Ad Public Keys and paste in your new key from the previous step...when complete, click ADD.
15. A new fingerprint will be displayed. Select that fingerprint and paste into the text editor of your choice.
16. Using all the things you put in your editor of choice, create the install command. Put yours all in one line...I broke this out to make it more readable:
java -jar oci_install.jar -host https://objectstorage.us-phoenix-1.oraclecloud.com
-pvtKeyFile /nas/dba/backups/cfg/opc_wallet/oci_pvt
-pubFingerPrint [paste finger print here]
-tOCID [paste tenancy OCID]
-uOCID [paste user OCID]
-libDir /nas/dba/backups/cfg
-walletDir /nas/dba/backups/cfg/opc_wallet
-bucket [the bucket you created in step 5]
-cOCID [the OCID of the compartment you're using, if any]
-configFile /nas/dba/backups/cfg
No comments:
Post a Comment